Introduction
There’s something undeniably joyful about making homemade pizza. The aroma of freshly baked dough wafting through the kitchen, the sight of vibrant toppings, and the satisfaction of crafting a delicious meal from scratch can transform a simple evening into a culinary celebration. Pizza is not only versatile—allowing for endless customization—but it’s also a fun gastronomic activity for families and friends alike. Whether you’re hosting a casual gathering or a romantic dinner, pizza brings everyone together.
One particularly charming way to elevate your pizza game is by shaping it into hearts, making it perfect for special occasions such as Valentine’s Day, anniversaries, or even just a cozy date night at home. The heart shape adds an element of fun and affection to your meal, showing that you put thought and creativity into your cooking. In this article, we’ll walk you through the delightful process of creating mini heart-shaped pizzas, ensuring that your culinary creation is as memorable and tasty as any restaurant offering.
In the following sections, we will cover everything you need to know to make these delightful pizzas—from gathering the essential ingredients to preparing the dough, baking, and serving suggestions that will impress your loved ones. Let’s dive in!
Understanding the Ingredients
Every pizza starts with quality ingredients, and knowing their roles in the recipe is crucial for achieving the best results. Here’s a breakdown of the key ingredients you’ll need to make your mini heart-shaped pizzas and why they matter.
All-Purpose Flour
All-purpose flour is the foundation of your pizza crust. It provides the necessary structure and texture, creating a chewy yet crisp bite. When selecting your flour, look for a high-protein content, as this will contribute to a better rise and a more satisfying texture. The gluten formed during kneading helps the dough become elastic, which is essential for shaping your heart-shaped creations.
Active Dry Yeast
Active dry yeast plays a pivotal role in leavening the dough, allowing it to rise and develop a light, airy texture. Yeast ferments the sugars present in the dough, producing carbon dioxide gas that causes the dough to expand. When using active dry yeast, make sure to activate it properly by mixing it with warm water and a pinch of sugar before adding it to your flour mixture. This step is crucial for ensuring that your pizzas have the perfect rise.
Sugar
Sugar might not be the first ingredient that comes to mind for pizza, but it’s essential in this recipe. Sugar serves two primary functions: it feeds the yeast, promoting healthy fermentation, and it adds a touch of sweetness to balance the flavors of the sauce and toppings. A small amount of sugar can make a significant difference in the overall taste of the crust.
Warm Water
The temperature of the water used in your dough is paramount to activating the yeast effectively. Warm water (around 110°F or 43°C) provides the ideal environment for yeast growth. Be cautious, however—if the water is too hot, it can kill the yeast, preventing your dough from rising. Always use a thermometer or test the water with your wrist to ensure it’s comfortably warm.
Salt
Salt is not just a flavor enhancer; it also plays a critical role in controlling yeast activity. By slowing down the fermentation process, salt helps develop a more complex flavor in your dough. It’s important to balance the amount of salt in your recipe, as too much can inhibit yeast growth, while too little can result in bland-tasting dough.
Olive Oil
Olive oil contributes both flavor and texture to your dough. It helps create a tender crust by coating the flour particles, which in turn improves the dough’s elasticity. Additionally, the rich taste of olive oil enhances the overall flavor profile of your pizza, making each bite more enjoyable.
Marinara Sauce and Mozzarella Cheese
No pizza is complete without its quintessential toppings: marinara sauce and mozzarella cheese. The marinara sauce adds a burst of tomato flavor and moisture, while mozzarella cheese brings that classic melty, gooey texture that we all crave. You can use store-bought sauce for convenience or whip up a quick homemade version for a personal touch.
Toppings
The beauty of pizza lies in its versatility, allowing you to customize it to suit your preferences or dietary needs. From classic pepperoni and vegetables to gourmet options like goat cheese and arugula, the sky’s the limit when it comes to toppings. For heart-shaped pizzas, consider using colorful veggies or unique ingredients that not only taste great but also look appealing when arranged on your dough.
Step-by-Step Guide to Making Mini Heart-Shaped Pizzas
Now that you have a clear understanding of the ingredients and their roles, let’s dive into the process of making your mini heart-shaped pizzas. Follow these steps closely to create a delicious and visually appealing dish.
Preparing the Dough
1. Mix the Dry Ingredients: In a large mixing bowl, combine 2 ½ cups of all-purpose flour, 1 packet of active dry yeast, 1 teaspoon of sugar, and 1 teaspoon of salt. Mix these dry ingredients thoroughly to ensure even distribution.
2. Activate the Yeast: In a separate bowl or measuring cup, combine 1 cup of warm water with the activated yeast mixture. Let it sit for about 5-10 minutes until it becomes frothy. This indicates that your yeast is alive and ready to work.
3. Combine Wet and Dry Ingredients: Create a well in the center of the dry ingredients and pour in the yeast mixture and 2 tablespoons of olive oil. Using a wooden spoon or your hands, mix until a shaggy dough begins to form.
4. Knead the Dough: Transfer the dough onto a lightly floured surface and knead it for about 5-7 minutes. You want to develop the gluten in the dough, which gives it structure. The dough should be smooth and elastic but not overly sticky. If it’s too sticky, sprinkle in a little more flour as needed.
Tips for Achieving the Perfect Dough Consistency
– Don’t Over-Knead: While it’s important to knead the dough, be careful not to overdo it. If the dough becomes too tough, your pizza crust will be dense instead of light and airy.
– Check the Texture: The dough should be slightly tacky to the touch but not stick to your fingers. If it sticks excessively, add small amounts of flour while kneading.
– Resting the Dough: After kneading, shape the dough into a ball and place it in a greased bowl. Cover it with a damp cloth or plastic wrap to prevent it from drying out.
First Rise
1. Allow the Dough to Rise: Place the covered bowl in a warm, draft-free area. Let the dough rise for about 1 hour or until it has doubled in size. This is the first rise, and it’s crucial for developing the flavor and texture of your crust.
2. Creating the Ideal Environment: If your kitchen is cool, you can create a warm environment by preheating your oven to the lowest setting for a few minutes, then turning it off. Place the dough inside with the oven light on, as this will provide a warm atmosphere for the yeast to thrive.
3. Signs of Proper Rising: After an hour, check if your dough has risen properly. It should be noticeably larger and have a puffy appearance. You can also gently poke the dough; if it springs back slowly, it’s ready for the next step.
Following these initial steps will set a solid foundation for your mini heart-shaped pizzas. With your dough prepared and resting, you will soon be ready to shape it into adorable hearts, add your favorite toppings, and bake them to perfection.
Stay tuned for the next part of this delightful pizza adventure, where we’ll dive into the shaping process, baking instructions, and creative serving suggestions that will make your heart-shaped pizzas truly unforgettable.
Shaping the Pizzas
To achieve the ideal mini heart-shaped pizzas, mastering the art of shaping the dough is key. Here’s how to create those perfect hearts:
Techniques for Shaping Dough into Perfect Hearts
1. Prepare the Dough: Start with well-kneaded pizza dough that has risen adequately. A rested dough is easier to manipulate and will yield a better texture.
2. Divide the Dough: Portion the dough into equal-sized balls, each about the size of a small orange. This ensures uniformity in your mini pizzas.
3. Flatten with Care: On a lightly floured surface, take one dough ball and gently press it down with your fingers, creating a small circle. Use your fingertips to spread the dough outward while keeping a thicker border for the crust.
4. Forming the Heart Shape: Using a rolling pin, roll the dough into a circle. Then, gently pinch the top center of the dough to create the heart’s distinctive “point” at the bottom while rounding the sides. You can also use a knife to trim the sides for a more defined shape.
5. Thickness and Evenness: Aim for a thickness of about 1/4 inch. This allows the crust to bake properly without becoming too crunchy or doughy. Ensure evenness throughout the dough to avoid undercooked or overcooked spots.
Importance of Thickness and Evenness in Shaping
Uniform thickness is crucial for even baking. If some parts are thicker than others, they will not cook at the same rate, leading to a less-than-ideal texture. A consistent thickness allows the crust to rise properly and achieve that delightful crunch, while still being soft on the inside. Taking the time to shape your dough carefully will result in aesthetically pleasing and delicious mini heart-shaped pizzas.
Adding Sauce and Toppings
Now that your dough is perfectly shaped, it’s time to add sauce and toppings.
Recommendations for Homemade vs. Store-Bought Marinara Sauce
– Homemade Marinara Sauce: If you want to elevate your mini pizzas, opt for a homemade marinara sauce. It’s simple to make and allows you to control the flavor. Just sauté garlic in olive oil, add crushed tomatoes, and season with basil, oregano, salt, and a touch of sugar. Simmer for 20 minutes to develop the flavors.
– Store-Bought Marinara Sauce: If you’re short on time, a high-quality store-bought marinara can be a great alternative. Look for brands that use natural ingredients and avoid added sugars or preservatives.
Ideas for Toppings Beyond Pepperoni
While classic pepperoni is always a hit, there’s a world of toppings to explore. Here are some exciting options:
– Vegetarian Options: Load your mini pizzas with a variety of vegetables such as bell peppers, mushrooms, spinach, red onions, and artichokes. These not only add flavor but also bring vibrant colors to your pizzas.
– Gourmet Ingredients: Consider using gourmet cheeses like goat cheese, mozzarella di bufala, or aged cheddar. Add toppings like prosciutto, arugula, or even a drizzle of balsamic glaze for a touch of sophistication.
– Creative Combinations: Mix and match flavors! Try BBQ sauce as a base with chicken, red onions, and cilantro, or go for a white pizza with ricotta, spinach, and a sprinkle of nutmeg.
Tips on How to Balance Flavors and Textures with Toppings
When selecting toppings, aim for a balance of flavors and textures. Use a combination of rich, creamy cheeses with fresh, crunchy vegetables. Consider the saltiness of cured meats and balance it with sweet or tangy elements like a drizzle of honey or a sprinkle of fresh herbs. Layer your toppings thoughtfully, starting with sauce, then cheese, and finally, your selected toppings, ensuring even distribution for optimal flavor in every bite.
Baking the Pizzas
With your mini heart-shaped pizzas assembled, it’s time to bake them to perfection.
Optimal Oven Temperature and Baking Time
Preheat your oven to a high temperature of 475°F (245°C) for a crispy crust. If you are using a pizza stone, place it in the oven during preheating to ensure it’s hot and ready for baking. Bake the mini pizzas for 10-12 minutes or until the crust is golden brown and the cheese is bubbly.
Recognizing When the Pizzas Are Done
Visual cues are your best friend here. Look for a golden-brown crust with cheese that is melted and slightly browned. The edges should be firm, and the bottom of the crust should be crisp. If you’re unsure, you can gently lift one pizza with a spatula to check the underside.
Suggestions for Using a Pizza Stone vs. a Baking Sheet
Using a pizza stone is ideal for achieving a well-cooked crust, as it retains heat and distributes it evenly. If you don’t have a pizza stone, a baking sheet works just fine. For a crispier base, preheat the baking sheet in the oven before placing the pizzas on it. This helps mimic the effect of a pizza stone.
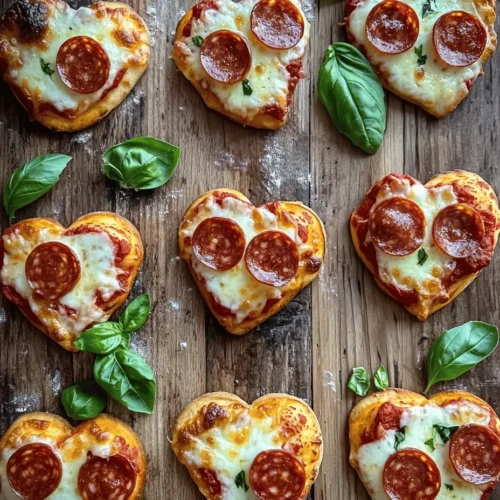
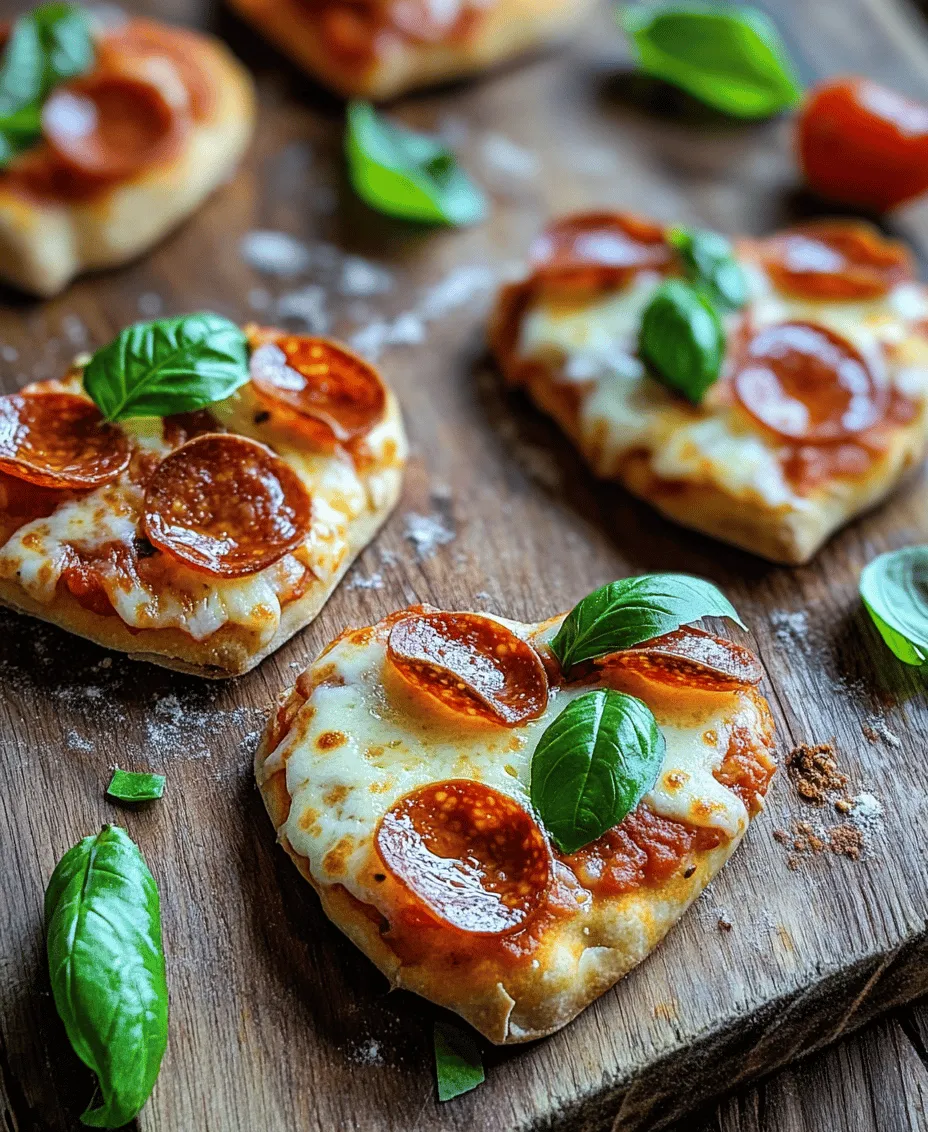
Serving and Presentation Ideas
The presentation of your mini heart-shaped pizzas can enhance the overall dining experience.
Creative Ideas for Serving Mini Heart-Shaped Pizzas
Serve your mini pizzas on a wooden board for a rustic feel or arrange them on a colorful platter for a festive occasion. For a romantic dinner, consider placing each pizza on individual plates with a small side salad.
Suggestions for Garnishing with Fresh Basil and Red Pepper Flakes
After baking, garnish your pizzas with fresh basil leaves for a pop of color and fresh flavor. A sprinkle of red pepper flakes can add a delightful kick, appealing to those who love a bit of heat.
Ideas for Side Dishes or Beverages That Pair Well with the Pizzas
Pair your mini heart-shaped pizzas with a fresh green salad drizzled with olive oil and balsamic vinegar. For beverages, a light red wine or sparkling water with lemon complements the flavors beautifully. If you’re serving these pizzas for a gathering, consider offering a selection of dipping sauces like garlic aioli or marinara for an extra treat.
Nutritional Information
When making pizzas at home, you have the opportunity to control the ingredients, resulting in a more nutritious meal.
An Overview of the Nutritional Aspects of Homemade Pizzas
Homemade mini pizzas can be healthier than their takeout counterparts, especially when you opt for whole-food ingredients. Whole wheat flour for the crust, fresh vegetables as toppings, and lean proteins can significantly enhance the nutritional profile of your meal.
Discussion on How Ingredient Choices Can Affect Healthfulness
Choosing whole wheat flour instead of refined flour boosts fiber content, while low-fat cheese options can reduce calories and saturated fat. Including a variety of vegetables not only adds vitamins and minerals but also increases the volume of your meal, helping you feel satisfied without overindulging.
Conclusion
The joy of making mini heart-shaped pizzas at home goes beyond just the delicious end product. It’s about the creativity involved in choosing toppings, the satisfaction of shaping the dough, and the warmth of sharing a meal with loved ones.
Encouraging personalization allows everyone to craft their own unique pizza masterpiece, making it an enjoyable activity for families, couples, or friends. This recipe offers endless possibilities for customization, so don’t hesitate to explore your favorite flavors and ingredients.
Cooking is not only an essential life skill but also a fun and bonding experience. By creating these mini heart-shaped pizzas, you can foster a love for cooking while enjoying delicious, homemade food. So roll up your sleeves, gather your ingredients, and start making these delightful pizzas that are sure to bring smiles and satisfaction to your dining table.