
Introduction to Fluffy Homemade Hot Dog Buns
There’s something undeniably satisfying about a perfectly cooked hot dog nestled within a fresh, fluffy bun. While store-bought options are convenient, nothing can compare to the taste and texture of homemade hot dog buns. In this article, we will explore the delightful process of making fluffy homemade hot dog buns. Perfect for summer barbecues, family gatherings, or even just a cozy night in, these buns are a game-changer for anyone who enjoys hot dogs. With a simple list of ingredients and straightforward steps, you can elevate your hot dog experience and impress your friends and family. Let’s dive into the recipe and understand the techniques that make these buns so fluffy and delicious.
Homemade hot dog buns allow you to control not only the ingredients but also the flavor and texture. Imagine biting into a warm, pillowy bun that complements your favorite hot dog perfectly. This recipe is designed for anyone, from novice bakers to seasoned pros, making it accessible and enjoyable. Whether you prefer classic toppings or adventurous gourmet combinations, these buns will serve as the ideal vessel for all your hot dog creations.
Understanding the Ingredients for Perfect Buns
To create the perfect fluffy hot dog bun, it’s essential to understand the role of each ingredient. Each component contributes to the overall texture and flavor, making it crucial to select the right ones. Below, we will dissect the key ingredients, highlighting their importance in the dough-making process.
The Essence of All-Purpose Flour
All-purpose flour is the backbone of any bread recipe, including our hot dog buns. The type of flour you choose plays a significant role in the final product. All-purpose flour contains a moderate amount of protein, typically around 10-12%. This protein is crucial for gluten development, which is what gives bread its structure and chewiness.
When you mix flour with water and knead the dough, gluten strands begin to form, creating a network that traps air bubbles produced by yeast. This process is essential for achieving that fluffy texture we all desire in hot dog buns. If you opt for higher protein flour like bread flour, you may end up with a denser bun, while using cake flour can lead to a less structured result. Therefore, all-purpose flour strikes the perfect balance for fluffy homemade hot dog buns.
The Sweetness of Granulated Sugar
Granulated sugar may seem like a simple ingredient, but it plays a significant role in the bread-making process. Sugar acts as food for the yeast, aiding in its activation. When you mix sugar into the warm liquid of your dough, it helps the yeast to multiply and produce carbon dioxide, which is what makes the buns rise.
Additionally, sugar contributes a subtle sweetness that complements the savory flavor of hot dogs. However, it’s important to balance this sweetness, as too much can overpower the taste of the bun. For our recipe, a few tablespoons of sugar is just the right amount to enhance both flavor and yeast activity without making the buns overly sweet.
The Power of Instant Yeast
When it comes to yeast, there are several types available, but instant yeast is a popular choice for home bakers. Instant yeast, unlike active dry yeast, does not require proofing in warm water before use. This means you can mix it directly with the dry ingredients, saving time and reducing steps in the baking process.
The beauty of instant yeast lies in its ability to produce a light and airy bun. It works effectively at a wide range of temperatures and provides a quick rise, making it ideal for those who want to enjoy fresh homemade buns without waiting for extended periods. By incorporating instant yeast into our recipe, you’ll achieve fluffy buns that are ready to be filled with your favorite hot dog.
The Role of Salt in Dough
Salt is another crucial ingredient in our hot dog bun recipe. While it may seem counterintuitive to add salt to something that’s already sweet, its role is multifaceted. Salt enhances the overall flavor of the buns, balancing out the sweetness from the sugar and the savory notes of the hot dogs.
Moreover, salt plays a vital role in controlling yeast fermentation. It regulates the yeast’s activity, ensuring that it doesn’t rise too quickly and allows for better gluten development. However, it’s important to measure salt accurately, as too much can inhibit yeast growth and lead to dense buns. A teaspoon or two is typically sufficient for enhancing flavor while allowing the yeast to do its job.
Using Whole Milk vs. Other Liquids
When it comes to liquids in bread recipes, warm milk is often the go-to choice. The warmth of the milk helps to activate the yeast more effectively, leading to a better rise. Additionally, whole milk adds richness and moisture to the dough, resulting in a softer, fluffier bun.
However, if you have dietary restrictions or prefer non-dairy options, there are plenty of alternatives. Almond milk, oat milk, or even water can be used in place of whole milk. Just ensure that any non-dairy milk is warmed before mixing to maintain the yeast’s effectiveness.
The Function of Unsalted Butter
Butter is the final touch that makes our hot dog buns irresistibly delicious. It contributes to both flavor and texture, giving the buns a rich, buttery taste and a soft crumb. When using unsalted butter, you have the advantage of controlling the salt content in your recipe, allowing for a more balanced flavor profile.
In our recipe, melted butter is preferred over solid butter, as it combines more easily with the liquid ingredients. This ensures an even distribution of fat throughout the dough, leading to a tender and fluffy final product.
Step-by-Step Guide to Making Fluffy Hot Dog Buns
Now that we understand the fundamental ingredients that contribute to our fluffy hot dog buns, let’s dive into the step-by-step process of making them. This guide will walk you through the mixing and creating of the dough, ensuring you achieve the perfect consistency for your buns.
Mixing the Dry Ingredients
Start by gathering your dry ingredients: all-purpose flour, granulated sugar, instant yeast, and salt. It’s best to use a large mixing bowl for this process. Combine the flour and sugar first, whisking them together to ensure they are evenly distributed. This step is crucial as it helps ensure that the yeast and salt are mixed in uniformly when added.
Next, add the instant yeast to the flour mixture. Make sure you’re using fresh yeast, as expired yeast will not activate properly, leading to flat buns. Once the yeast is added, sprinkle the salt over the mixture. It’s essential to keep the salt separate from the yeast until you’re ready to combine everything, as direct contact can hinder yeast activation.
Thoroughly whisk the dry ingredients to eliminate any lumps and ensure an even mixture. This is the foundation of your dough, and taking the time to prepare it properly will pay off in the final texture of the buns.
Combining the Wet Ingredients
After mixing the dry ingredients, it’s time to prepare the wet ingredients. In a medium saucepan, gently warm the whole milk until it’s just about lukewarm—around 100°F (38°C) is ideal. Avoid overheating, as temperatures above 120°F (49°C) can kill the yeast.
Once the milk is warmed, remove it from the heat and add the melted unsalted butter, stirring until well combined. If you’re using any alternative liquid, ensure it is also warmed to a suitable temperature.
In a separate bowl, crack in your eggs and whisk them until they are well combined. Add the egg mixture to the warm milk and butter mixture, stirring until smooth. The warmth of the liquid will help to gently temper the eggs, ensuring a cohesive mixture that will blend seamlessly with the dry ingredients.
Creating the Dough
Now that you have both your dry and wet ingredients prepared, it’s time to combine them to form the dough. Start by creating a well in the center of the dry ingredients and pour in the wet mixture. Using a wooden spoon or spatula, gradually mix the dry ingredients into the wet ingredients, starting from the edges of the well and working your way in.
As you mix, you’ll notice the dough beginning to come together. At this point, it’s essential to recognize the right consistency. The dough should be slightly sticky but should pull away from the sides of the bowl. If it feels too dry, you can add a splash of warm milk, and if it’s too wet, sprinkle in a bit more flour.
Once the dough starts to form, it’s time to transition to kneading. Dust a clean surface with a light coating of flour and turn the dough out onto it. Knead the dough for about 8-10 minutes, or until it becomes smooth and elastic. This step is critical for developing gluten, which will give your buns their delightful fluffiness.
After kneading, shape the dough into a ball and place it in a lightly greased bowl, covering it with a clean kitchen towel. Let it rise in a warm, draft-free area until it doubles in size, typically taking about 1 to 2 hours.
As we progress through this recipe, remember that patience is key. The result will be well worth the wait, yielding soft, fluffy hot dog buns that are perfect for any occasion. Stay tuned for the next part of this article, where we will delve into shaping, baking, and finishing these delightful homemade buns.
Kneading Techniques for Elasticity
Kneading is a crucial step in bread-making that helps develop gluten, giving your buns the fluffy texture we all crave. To properly knead the dough, turn it out onto a clean, lightly floured surface. With the heel of your hand, push the dough away from you, then fold it over itself. Rotate the dough a quarter turn and repeat the process. This method encourages the formation of gluten strands, making your buns light and airy.
Signs That the Dough is Ready to Rise: After kneading for about 8-10 minutes, your dough should feel smooth and elastic to the touch. You can perform the “windowpane test” to check if the gluten is developed sufficiently; take a small piece of dough and stretch it gently. If it can stretch thin enough to let light through without tearing, it’s ready to rise.
First Rising: The Magic of Fermentation
Once your dough has been kneaded to perfection, it’s time for the first rise, also known as fermentation. This step is essential as it allows the yeast to feed on the sugars in the dough, creating carbon dioxide that makes your buns rise.
Creating an Optimal Environment for Rising: To encourage fermentation, place your dough in a warm, draft-free environment. A good method is to preheat your oven to the lowest setting for a few minutes, then turn it off and place the dough inside with the door closed. Alternatively, you can set it near a warm stovetop or in a sunny spot in your kitchen.
Timing and Visual Cues for Readiness: Allow the dough to rise until it has doubled in size. This usually takes about 1 to 1.5 hours, but keep an eye on it. The dough should feel light and puffy when you gently poke it; if the indentation remains, it’s time to move on to the next step.
Shaping the Buns for Uniformity
After the dough has risen beautifully, it’s time to shape the buns. This step not only affects the visual appeal but also ensures even baking.
Method for Dividing and Shaping Dough: Turn the risen dough out onto a lightly floured surface. Using a bench scraper or a sharp knife, divide the dough into equal portions, each weighing about 3 ounces for standard-sized hot dog buns. Gently shape each piece into a ball by tucking the edges into the center and rolling it on the surface.
Importance of Size for Even Baking: Uniformity is key here; if some buns are larger than others, they will bake at different rates, leading to inconsistencies in texture and doneness. Aim for equal-sized pieces, ensuring they all rise and bake beautifully.
Second Rising: The Final Touch
Now that your buns are shaped, they need a final rise before baking.
Preparing the Shaped Buns for Baking: Place the shaped buns on a parchment-lined baking sheet, leaving enough space between them to expand. Cover the buns loosely with a clean kitchen towel or plastic wrap to prevent drying out.
Tips for Spacing and Covering During the Rise: When covering the buns, ensure that the covering material does not touch the dough. This can be achieved by using a large bowl or placing a piece of parchment paper over the buns before covering with the towel. Let them rise for about 30-45 minutes, or until they have puffed up significantly.
Baking the Perfect Hot Dog Buns
With the buns now fully risen, it’s time to bake them to golden perfection.
Preheating the Oven: Preheat your oven to 375°F (190°C). Preheating is crucial as it ensures even baking from the moment the dough enters the oven. A properly preheated oven helps create the steam necessary for a good rise and a crunchy crust.
Temperature Considerations for Different Types of Ovens: If you’re using a convection oven, you may want to lower the temperature by about 25°F, as convection ovens circulate heat more efficiently. For traditional ovens, stick with the recommended temperature for optimal results.
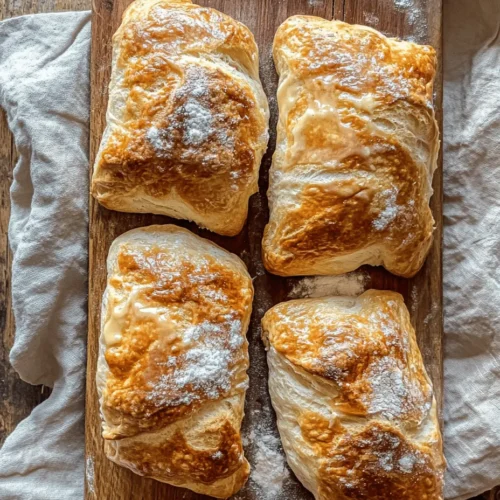
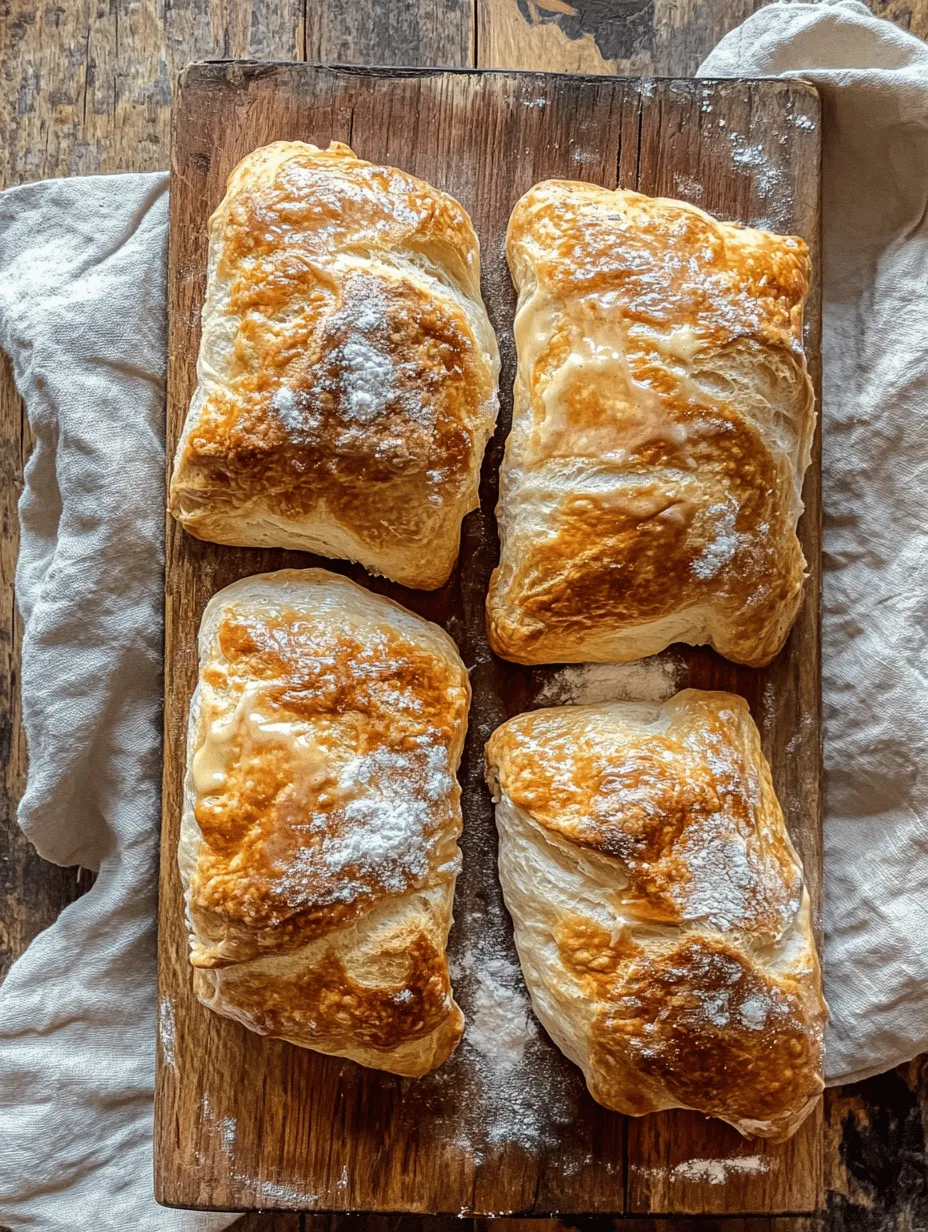
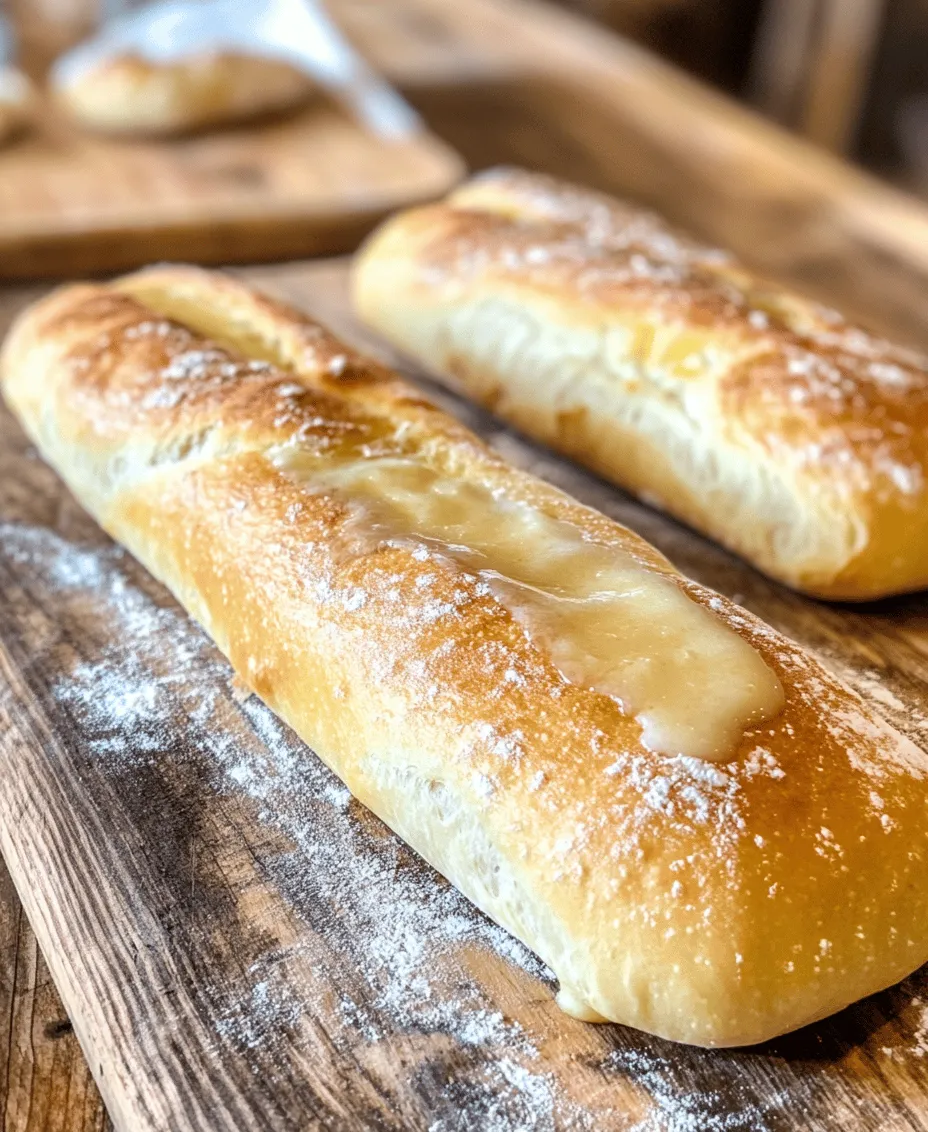
Baking Time and Visual Cues: Bake the buns for about 15-20 minutes, or until they are golden brown. Pay attention to the color; the ideal bun should have a rich, golden hue. The Maillard reaction, which occurs when the sugars and proteins in the dough react to heat, is responsible for the color and flavor. If you find that the tops are browning too quickly, you can tent them with aluminum foil halfway through the baking time.
Cooling and Final Touches
After baking, it’s essential to allow the buns to cool properly.
Importance of Cooling on a Wire Rack: Remove the buns from the oven and transfer them to a wire rack. This allows airflow around the buns, preventing them from becoming soggy. Let them cool for at least 10 minutes before handling.
Optional Butter Brushing for Enhanced Flavor: For an added touch of flavor and richness, you can brush the tops of the hot dog buns with melted butter immediately after they come out of the oven. This not only enhances the taste but also gives them a beautiful sheen.
Serving Suggestions and Pairings
Now that your fluffy homemade hot dog buns are ready, it’s time to think about serving them.
Creative Ways to Fill Your Buns: While traditional hot dogs are a classic choice, don’t hesitate to explore other fillings. Consider gourmet sausages, grilled vegetables, or even pulled pork for a delightful twist. Toppings such as sauerkraut, coleslaw, jalapeños, or various sauces can elevate your hot dog experience further.
Other Uses for Fluffy Buns Beyond Traditional Hot Dogs: These versatile buns can also be used for sliders, sandwiches, or mini burgers. Their soft texture makes them perfect for any filling, whether savory or sweet.
Pairing with Sides and Drinks
To complement your homemade hot dog buns, consider offering a selection of sides and beverages.
Suggested Sides That Complement Hot Dogs: Classic sides include crispy French fries, coleslaw, potato salad, or baked beans. You can also serve grilled corn on the cob or fresh salads to add a refreshing touch to your meal.
Beverage Pairing Ideas for Different Occasions: Pair your hot dog feast with cold beverages like lemonade, iced tea, or craft beer for a casual summer barbecue. For a more formal gathering, consider serving with chilled white wine or sparkling water infused with fruit.
Conclusion: Enjoying Your Homemade Hot Dog Buns
In conclusion, making fluffy homemade hot dog buns is a rewarding process that not only enhances the flavor and texture of your meal but also adds a personal touch to your dining experience. With practice and patience, anyone can master the art of bread-making and create buns that are sure to be a hit at any gathering. Embrace the joy of cooking and enjoy the fruits of your labor with your favorite hot dog fillings and toppings, making every bite a delight. Whether it’s a family barbecue or a casual weeknight dinner, your homemade buns are bound to impress. Happy cooking!