
Introduction
Imagine a dessert that beautifully marries the rich, creamy texture of flan with the moist, chocolatey goodness of cake. This is precisely what the Decadent Chocolate Flan Cake offers—a luxurious treat that will delight dessert lovers and impress home bakers alike. Originating from Latin American cuisine, this cake is not only a feast for the eyes but also a celebration of flavors and textures. Its popularity has soared in recent years, becoming a staple at birthday parties, family gatherings, and festive occasions.
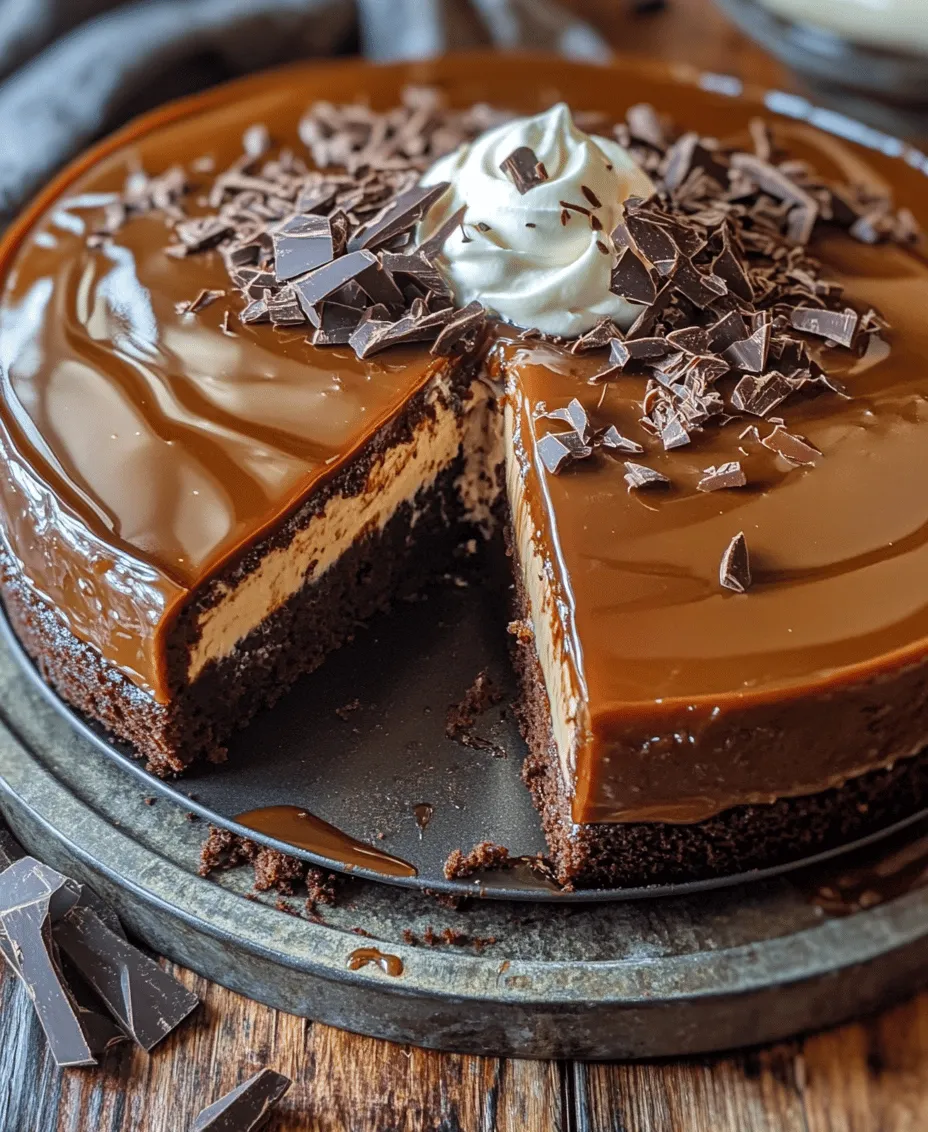
The beauty of the Chocolate Flan Cake lies in its unique combination of layers: a luscious flan nestled atop a rich chocolate cake. Each slice reveals a stunning contrast between the smooth, velvety flan and the dense, flavorful chocolate cake, creating an experience that is both indulgent and satisfying. This dessert speaks to anyone who appreciates the art of baking and the joy of sharing sweet moments with loved ones.
In this article, we invite you to embark on a culinary adventure that will challenge your baking skills and reward you with one of the most delightful desserts imaginable. Whether you’re an experienced baker or a novice looking to impress, this recipe will guide you through the process of creating a stunning Chocolate Flan Cake that is sure to become a favorite in your household.
Understanding the Layers of Decadence
The Decadent Chocolate Flan Cake is not just a simple dessert; it is a harmonious blend of two distinct layers that come together to create a delightful experience for the palate.
The Flan Layer
The flan layer is the star of this dessert—a creamy and rich custard that is silky smooth and bursting with flavor. Made primarily from sweetened condensed milk, evaporated milk, eggs, and vanilla extract, the flan offers a luxurious mouthfeel that contrasts beautifully with the denser chocolate cake. The sweetness of the flan provides a perfect balance to the chocolate’s richness, ensuring that each bite is a harmonious blend of flavors.
One of the essential elements of creating the perfect flan is the caramel. When prepared correctly, it adds a deliciously sweet and slightly bitter note that enhances the overall flavor of the dessert. The caramel also serves as a beautiful glaze on the top of the flan, giving the cake an elegant appearance.
The Chocolate Cake Layer
Beneath the flan lies the chocolate cake layer, which is moist, tender, and deeply flavored. This cake is made using classic baking ingredients such as all-purpose flour, granulated sugar, unsweetened cocoa powder, baking powder, baking soda, and vegetable oil. Each of these components plays a crucial role in achieving the perfect texture and flavor profile. The unsweetened cocoa powder is particularly important, as it provides the rich chocolate taste that makes this cake so irresistible.
The addition of boiling water to the batter is a key technique that enhances the cake’s moisture and creates a tender crumb. This step helps to dissolve the cocoa powder and fully integrate it into the batter, resulting in a deeply chocolatey flavor that complements the creamy flan layer perfectly.
The Delightful Contrast
What sets the Decadent Chocolate Flan Cake apart is the delightful contrast between the two layers. The creamy flan atop the moist chocolate cake creates an explosion of textures and flavors that is both decadent and satisfying. The balance of sweetness is crucial; the flan’s sweetness is moderated by the deep, rich flavors of the chocolate cake, ensuring that neither layer overwhelms the other. This balance is what makes the cake not just a dessert but a memorable experience to share with friends and family.
Ingredients Breakdown
To create this Decadent Chocolate Flan Cake, it is essential to gather all the necessary ingredients. Each component contributes to the overall flavor and texture of the cake, so it’s important to use high-quality ingredients for the best results.
Ingredients for the Flan Layer
1. Sweetened Condensed Milk: This ingredient is the foundation of the flan, providing sweetness and creaminess. If you’re looking for a substitute, you can use coconut milk or almond milk mixed with sugar, though the flavor will differ slightly.
2. Evaporated Milk: This milk adds richness and helps to achieve a smooth texture in the custard. It is essential for creating that velvety mouthfeel.
3. Eggs: Eggs act as a binding agent in the flan, giving it structure and helping it set properly. They are vital for achieving the creamy custard texture.
4. Vanilla Extract: A touch of vanilla extract enhances the flavor of the flan, adding a warm, aromatic note that beautifully complements the sweetness of the dessert.
5. Sugar for Caramel: The sugar used for the caramel must be cooked carefully to achieve the right color and flavor. This caramel not only adds a delicious layer of sweetness but also creates a visually appealing glaze over the flan.
Ingredients for the Chocolate Cake Layer
1. All-Purpose Flour: This is the essential structure component of the cake. It gives the cake its form and helps it rise.
2. Granulated Sugar: Sugar adds sweetness and moisture to the cake, ensuring it remains tender and flavorful.
3. Unsweetened Cocoa Powder: The foundation of the chocolate flavor, cocoa powder is what makes this cake a chocolate lover’s dream.
4. Baking Powder and Baking Soda: These leavening agents are critical for helping the cake rise to perfection, creating a light and airy texture.
5. Vegetable Oil: This ingredient adds moisture and richness to the cake, contributing to its tender crumb.
6. Boiling Water: The use of boiling water in the batter is a unique step that helps to dissolve the cocoa powder, enhancing the chocolate flavor and ensuring the cake remains moist.
Step-by-Step Instructions for Creating the Cake
Preparing the Caramel
To begin your journey in creating the Decadent Chocolate Flan Cake, you first need to prepare the caramel. This step requires patience and attention, as the caramel is the first layer that will set the stage for the flan.
1. Gather Your Ingredients: For the caramel, all you need is granulated sugar. It’s best to measure the sugar ahead of time so you can focus on the cooking process.
2. Melt the Sugar: In a medium saucepan over medium heat, add the sugar. Allow it to melt gradually, stirring gently with a wooden spoon or heat-resistant spatula. Do not rush this process; if the sugar burns, it will impart a bitter flavor to your caramel.
3. Watch for Color Change: As the sugar melts, it will begin to turn a light golden color. Continue to stir gently, ensuring that it melts evenly. Once the sugar reaches a deep amber hue, remove it from the heat immediately to prevent burning.
4. Coat the Pan: Quickly pour the melted caramel into the bottom of your cake pan, tilting the pan to coat the bottom evenly. Be cautious, as the caramel will be extremely hot. Allow the caramel to cool and harden while you prepare the flan layer.
This initial step sets the stage for the rest of the cake, ensuring that the flan will have a beautiful glaze and a rich caramel flavor that complements the chocolate layer.
Stay tuned for the next sections, where we will delve into the detailed preparation of the flan and chocolate cake layers, ensuring you achieve the perfect Decadent Chocolate Flan Cake that will impress everyone at your next gathering.
Techniques for Achieving the Perfect Caramel Consistency
Creating the perfect caramel is an essential step in achieving that luxurious layer atop your decadent chocolate flan cake. The key to a smooth, glossy caramel lies in the way you heat the sugar. Start by using a heavy-bottomed saucepan to ensure even heat distribution. Place your sugar in the pan and turn the heat to medium. As the sugar begins to melt, gently swirl the pan (avoid using a spoon, as stirring can cause the sugar to crystallize).
You’ll want to remove it from the heat once it reaches a rich amber color; this usually takes about 8-10 minutes. Remember, once sugar starts to caramelize, it can go from perfect to burnt very quickly, so keep a close eye on it.
Safety Tips When Working with Hot Sugar
Working with hot sugar requires caution as it can reach temperatures upwards of 350°F, which can cause severe burns. Always use long-handled utensils when stirring or swirling the caramel. Additionally, keep a bowl of ice water nearby; if you accidentally get sugar on your skin, plunging the area into ice water can help minimize damage. When pouring the caramel into your cake pan, do so slowly and carefully to prevent any spills.
Making the Flan Layer
The flan layer is where the magic happens, and getting the mixture just right is crucial. Start by blending eggs, sweetened condensed milk, evaporated milk, and vanilla extract. For a smooth consistency, it’s best to use a blender or an immersion blender. Blend until the mixture is completely smooth, ensuring that no lumps remain, as these will affect the texture of your final product.
Importance of Blending for a Smooth Consistency
A smooth flan mixture is essential to achieving that creamy texture. If you find any lumps in your mixture, they will not dissolve during baking and could result in an uneven texture. Blending at a medium speed for about 1-2 minutes should yield a perfectly smooth mixture. For an extra touch, you can strain the mixture through a fine-mesh sieve before pouring it into the pan.
How to Pour the Flan Mixture Correctly
When it comes time to pour the flan mixture into the pan with the caramel, do so slowly, and preferably over the back of a spoon. This method helps to prevent the two layers from mixing, allowing the caramel layer to remain intact on the bottom. Pour gently and avoid splashing to ensure a clean pour.
Preparing the Chocolate Cake Batter
Next, it’s time to prepare the chocolate cake batter. Start by preheating your oven to 350°F (175°C). In one bowl, combine your dry ingredients: flour, cocoa powder, baking powder, baking soda, and salt. In another bowl, whisk together the wet ingredients: eggs, sugar, melted butter, and vanilla extract.
Mixing Dry and Wet Ingredients: Tips for Avoiding Lumps
To avoid lumps in your batter, it’s important to add the dry ingredients to the wet ingredients gradually. Instead of dumping everything in at once, add about a third of the dry mixture, stir until just combined, and then continue adding the dry ingredients in increments. This technique helps to evenly distribute the flour and ensures you don’t overmix.
Importance of Folding in Boiling Water for Texture
One of the unique aspects of this chocolate cake recipe is the addition of boiling water. After you’ve mixed your wet and dry ingredients, carefully stir in the boiling water. This step not only helps to dissolve any remaining lumps but also creates a batter that is thinner and more fluid, resulting in a moist and tender cake. The heat from the water also helps to bloom the cocoa powder, enhancing the chocolate flavor.
Layering the Cake
Now it’s time to layer the cake. Carefully pour the chocolate cake batter over the flan mixture in the prepared pan. It’s crucial not to stir or combine the layers at this stage, as you want them to remain distinct. The cake batter will naturally float above the flan mixture due to its density.
Why It’s Crucial Not to Stir the Layers
Stirring the layers can result in an undesirable marbled effect, which detracts from the visual appeal of the final cake. By letting the layers remain separate, you’ll achieve that stunning contrast between the rich chocolate cake and the creamy flan, which is the hallmark of this dessert.
Visual Cues to Look for During This Stage
As you layer the cake, you should see the chocolate batter settling on top of the flan. The two mixtures should not mix, and you’ll see a clear distinction between the dark batter and the lighter flan layer below. This visual cue indicates that you’ve achieved the correct layering technique.
Baking the Cake
For the baking process, the water bath method is essential. This technique involves placing the cake pan in a larger baking dish filled with hot water. The water bath not only helps to regulate the temperature during baking but also prevents the flan layer from overcooking and cracking.
Explanation of the Water Bath Method and Its Benefits
The water bath, or bain-marie, creates a humid baking environment, which is particularly beneficial for custard-based desserts like flan. It helps to cook the flan evenly and gently, resulting in a silky texture without any curdling. Additionally, it prevents the top of the cake from drying out.
Baking Time and Testing for Doneness
Bake the cake for approximately 50-60 minutes. To test for doneness, insert a toothpick into the center of the cake; it should come out clean or with a few moist crumbs attached. Be careful not to overbake, as this could lead to a dry cake.
Cooling and Inverting the Cake
Once baked, it’s crucial to cool the cake properly. Allow it to sit in the water bath for about 30 minutes after removing it from the oven. This step helps to stabilize the flan and makes it easier to invert later.
Techniques for Properly Cooling in the Water Bath
Once you’ve allowed the cake to cool in the water bath, remove it from the water and let it cool at room temperature for an additional 30 minutes. Afterward, refrigerate the cake for at least 4 hours or overnight. Chilling helps to set the flan layer, making it easier to invert.
Tips for Inverting Without Damaging the Cake
When it’s time to invert the cake, run a knife around the edges of the pan to loosen it. Place a serving platter upside down on top of the cake pan, and with quick, confident movements, flip the pan over. If done correctly, the cake should release easily, revealing a beautifully layered dessert.
Serving Suggestions and Presentation Ideas
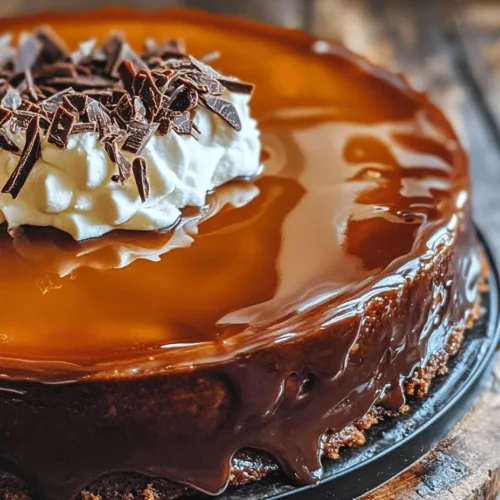
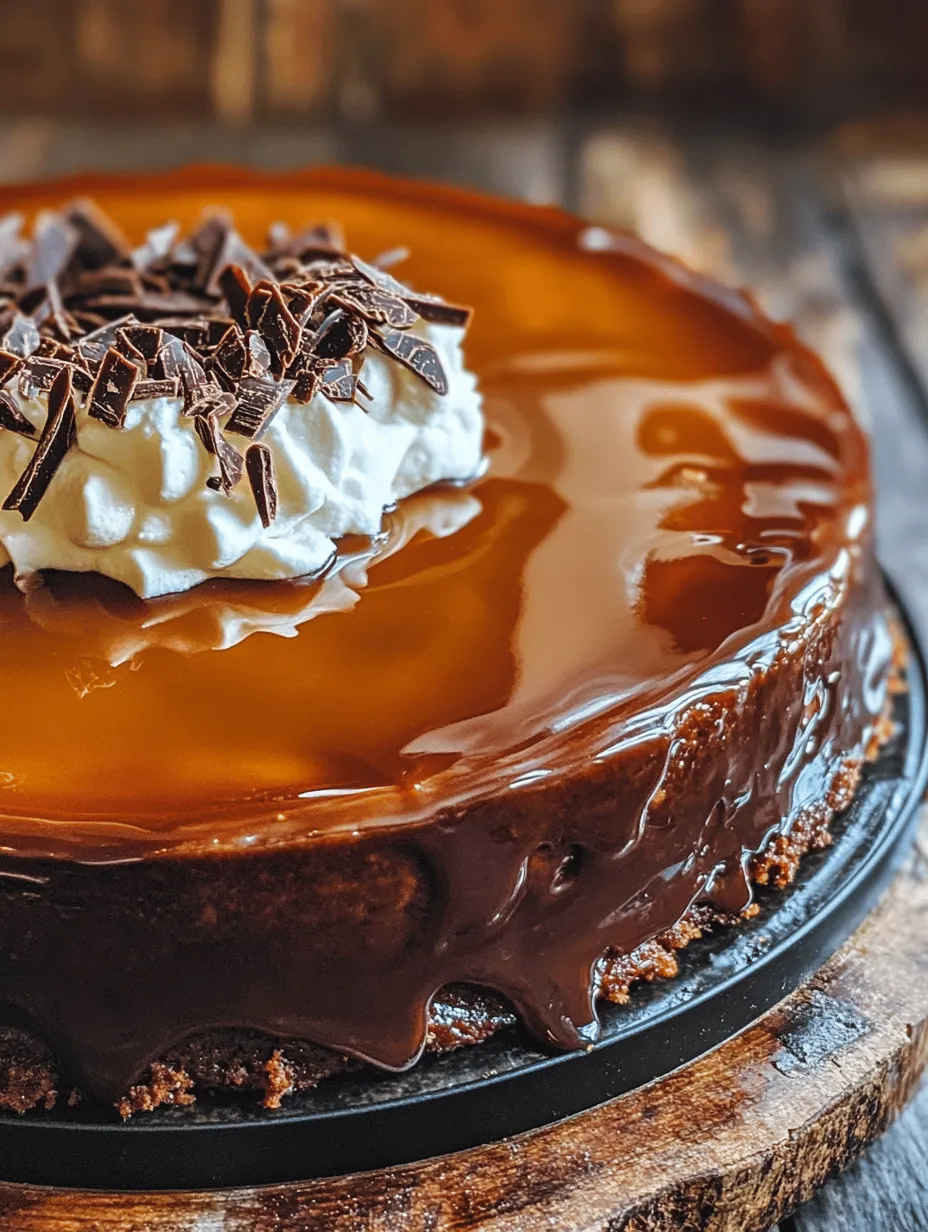
When it comes to serving your decadent chocolate flan cake, presentation is key. Garnishing the cake adds an inviting touch. Consider topping it with chocolate shavings for an elegant look, a dollop of freshly whipped cream for added creaminess, or fresh fruits like strawberries or raspberries for a pop of color and freshness.
Ideas for Garnishing the Cake
You can also sprinkle some sea salt on top for a contrast to the sweetness, or drizzle a chocolate ganache over the top for extra indulgence. Each of these garnishes complements the rich flavors of the cake and enhances its appeal.
Serving Presentation Tips
To showcase the beautiful layers, slice the cake and serve it on a white or light-colored plate that creates a striking contrast against the dark cake. This not only enhances the visual appeal but also highlights the stunning flan layer underneath.
Perfect Pairings: Beverages or Sides That Complement the Cake
Pair your decadent chocolate flan cake with a rich, dark coffee or a glass of dessert wine like Port or Moscato. For a non-alcoholic option, a creamy vanilla bean milkshake or a spiced hot chocolate can elevate the dessert experience.
Nutritional Information
While this decadent treat is indulgent, it’s important to be mindful of portion sizes. On average, one slice of chocolate flan cake contains approximately 350-400 calories, depending on the specific ingredients used. The cake is rich in flavor, so a small slice is often enough to satisfy your sweet tooth.
Discussion on Indulgence Versus Moderation in Dessert Consumption
Desserts like this chocolate flan cake can be enjoyed as part of a balanced diet. The key is moderation. Allowing yourself to savor a small piece can be a delightful way to indulge without overdoing it. Remember, the experience of enjoying a well-made dessert is just as important as the dessert itself.
Conclusion
This decadent chocolate flan cake is a show-stopping dessert that beautifully combines the richness of chocolate with the creamy texture of flan. Its unique appeal lies in its stunning layers and delightful flavors that are sure to impress at any gathering.
We invite you to try this recipe and enjoy the rich, indulgent flavors it offers. Don’t hesitate to share your personal experiences or variations you’ve tried. Cooking is all about creativity, and we would love to hear how you made this recipe your own!